Generalized WTP (The “Easy” Button)
Clients often ask researchers about WTP for attribute levels. To this request, the researcher should inquire:
1)Which level of each attribute is the reference level, relative to which WTP should be computed?
2)What is your firm’s base case product and starting price that we should assume when computing WTP?
3)What competitors should be placed into the market simulation scenario when computing WTP?
While clients usually can answer question #1, it’s typical for them not to know regarding questions #2 and #3, nor to have thought through the ramifications of those questions. “I don’t know…we just want WTP!” they may respond.
Our Generalized WTP approach (what we internally have called the “easy” button) provides a way to compute default generalized WTP given competition without requiring answers to any of the three questions above. It does so by:
a)assuming the reference level for each attribute should be the level with the lowest preference,
b)taking the median of WTP estimates across one thousand (though you can change this default) random draws of the firm’s product along with competitors’ product attribute specifications.
The strength of the generalized approach is that it doesn’t require the researcher to assume any specifics about the firm’s product and its competition. It generalizes the calculations by taking the median across hundreds or thousands of randomly selected product specifications for the firm’s product and the competitors.
Generalized WTP Steps:
1.Estimate individual-level utilities (typically via HB) for your CBC, ACBC, CVA, or ACA project.
2.Launch the Choice Simulator within Lighthouse Studio (or the standalone version).
3.Click the dropdown flyout under the Add icon, revealing the Add + Create Willingness to Pay Scenario... option.
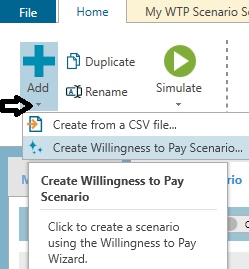
4.After you click the Create Willingness to Pay Scenario... option, a dialog appears in which you can select for which attributes to estimate WTP, and how many competitors to assume.
| Click Finish and a new WTP simulation scenario is added as a new tab, with Range() functions automatically specified to accomplish the random sampling of competitors along with random sampling for the WTP product (which is specified on the first row). Notice on the My WTP Scenario tab that the Range Behavior has automatically been toggled to Willingness to Pay. |

5.If you want to proceed with the default settings, the only thing left to do is to click the Simulate button.
After typically 5 to 30 minutes of simulation, a report is shown, with WTP reported by attribute. The median result across the hundreds or thousands of sampling of scenarios with WTP analysis is reported.
Targeting WTP for Specific Inclusions/Exclusions:
Because WTP can vary depending on which product it is attached to and the characteristics of competitors, you'll soon learn that you can be more specific in your WTP assumptions and simulation scenario setup. For example, you can set the brand for the WTP product to be your brand, rather than varying randomly across the brands. After all, the WTP for a given feature enhancing a Ferrari may be different than the WTP for the same feature enhancing a Toyota. Or, you can assume that only your brand can take on a specific feature enhancement (because you have a patent), but competitors cannot. Being more specific about the base case products and competitors in the product specification grid allows us to obtain more useful and targeted WTP information.
For example, if your product is brand 1, you could specify "1" for the Brand attribute in the My Product row rather than the default "=RANGE(1,3)" entry. If you wanted to specify that competitors 1-5 should take on only brands 2 or 3, then you could specify "1,3" in the Brand cell for the competitors.