Custom Styles With CSS
Lighthouse HTML "Hooks" for CSS
Custom CSS (Cascading Style Sheets) can be used throughout Lighthouse Studio to modify the look of the survey.
By default, the style settings throughout Lighthouse Studio are empty. For instance if you create a new question and click the paintbrush icon for Header 1 there is no font size specified. If no font size is specified at the question level, the font size specified at a higher level is used. CSS features cascading levels of priority. A font size can be specified for all text in a survey or for a particular question. A font size defined for a particular question overrides the font size defined at the study level.
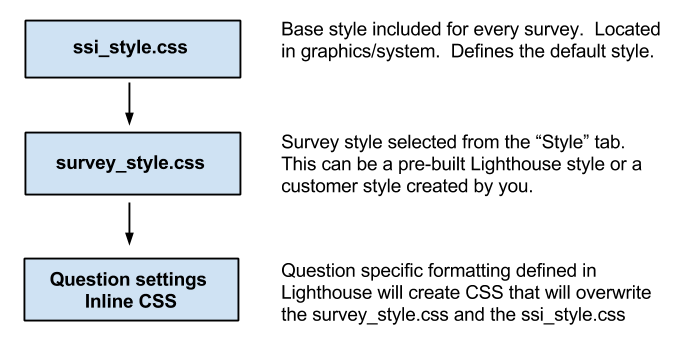
Lighthouse Studio has built in CSS that controls survey styles. The diagram below helps illustrate how CSS is used in Lighthouse Studio, demonstrating the different levels of Style priority. Styles defined at the question level override styles defined in the survey style. Styles defined in the survey style override styles defined in the base style sheet ssi_style.css.
CSS stands for Cascading Style Sheets. CSS allows you to modify the style (background color, font style, spacing, etc.) of the HTML for web pages. CSS allows you to separate the style from the structure of a web page.
CSS can be defined within the HTML elements. For example:
<p style="color: green;">
Please answer the questions below.
</p>
The CSS "color: green;" changes the text color within the <p> tag to green. This style can be separated from the <p> tag. The following instructions:
<style type="text/css">
p
{
color: green;
}
</style>
<p>
Please answer the questions below.
</p>
change all of the text within <p> tags on page to green.
Suppose that you have multiple web pages and you want the text inside all <p> tags for all pages to be green. You can create a separate text file named "mystyle.css" that includes the following CSS:
p
{
color: green;
}
At the top of each web page inside of the <head> tag you would then include:
<link rel="stylesheet" type="text/css" href="mystyle.css">
This controls the style for all web pages from one file. To change the color from green to blue you would simply edit mystyle.css. Using CSS in this way makes changing the style across your web pages much easier than defining the style on each individual page. Styles defined in an external file have lower priority than styles defined within a <style> tag on the web page. Styles defined within the HTML inside of a "style" attribute have a higher priority than styles defined within the <style> tag.
CSS consists of various style "rules" that define how to modify the appearance of the HTML. In the CSS rule below the "p" is the selector and the "color: green" is the declaration.
p
{
color: green;
}
The selector identifies which part of the HTML will be affected by the declaration. The declaration consists of a property and a value separated by a colon. Multiple declarations are separated by semicolons. For example:
p
{
color: green;
font-size: 18px;
padding: 10px;
}
The selector can be the name of any HTML element. For example: p, div, span, table, tr, td, etc. Multiple elements can be added to the rule separated by commas. For example:
div, p, td
{
color: green;
}
The CSS above changes text within <div>, <p>, and <td> tags to green. You can also specify that only <p> tags within <div> tags should be selected:
div p
{
color: green; /*Turn the text green*/
}
Notice that there is a space separating "div" from "p". This indicates that only <p> tags within <div> tags are affected. Also notice the comment "Turn the text green." CSS comments are contained between /* and */. Any text between /* and */ will not affect the CSS.
A Class Selector is a way that you can identify specific HTML elements. Suppose you have the following HTML:
<div class="header1">
How old are you?
</div>
The <div> above has an attribute named "class" with a value of "header1". You identify a class in CSS by placing a "." in front of its name. For example
.header1
{
color: green;
}
The CSS above makes the text within tags with the "header1" class be green. Lighthouse Studio uses class selectors heavily. Classes are designed to identify one or more elements on the web page. If there is a unique element identified with an "id" then a "#" sign is used instead of a ".". For example:
<div id="Q1_div">
How old are you?
</div>
The following CSS could be used to select this <div>:
#Q1_div
{
color: green;
}
Lighthouse Studio includes many classes and IDs within the HTML that it creates to help you identify specific areas of the page. You can then use these "class" and "id" names within your CSS.
More information on CSS can be found at http://www.w3schools.com/css.
Lighthouse HTML "Hooks" for CSS
Lighthouse Studio generates the HTML for your survey based on the different question types and settings you configure in the software. The HTML contains "class" and "id" attributes in many of its tags. For example the HTML for Header 1 looks like this:
<div class="header1"> Header 1 Text </div>
The "class" attribute in the <div> tag above identifies Header 1. The following CSS can then be used to change the Header 1 text color throughout the whole survey:
.header1
{
color: green;
}
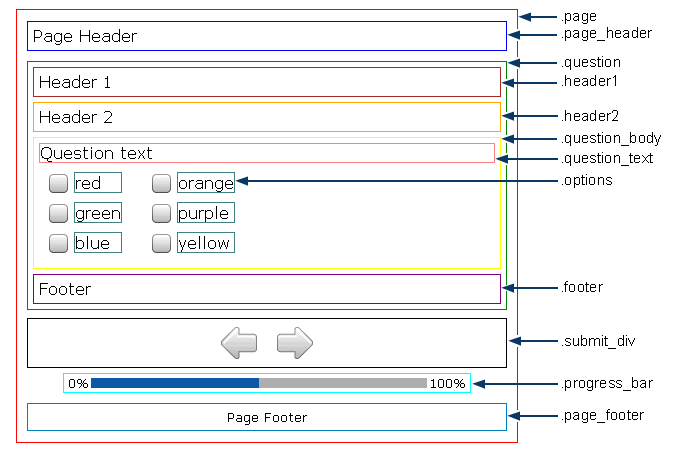
The diagram below shows some of the main classes present in Lighthouse's HTML.
Additional classes and ids can be examined by viewing Lighthouse's HTML. This can be done using "View Source" in your web browser.
Some HTML elements in Lighthouse Studio contain multiple classes and an id. Various ways have been provided to allow the CSS to manipulate the presentation or style of the survey. The HTML for a select question named "Q1" looks like this:
<div id="Q1_div" class="question select">
...
</div>
Notice that two classes "question" and "select" have been assigned to this <div> tag.
The following CSS changes the Header 1 style for Q1. No other questions are affected.
#Q1_div .header1
{
color: blue;
}
The # sign above identifies the HTML tag with the "Q1_div" id. After "#Q1_div" there is a space and then ".header1". This CSS rule changes the text for Header 1 to blue inside question Q1. The following draws a black border around all questions:
.question
{
border: 1px solid black;
}
The following changes the border only for Select questions to green:
.select
{
border: 1px solid green;
}