Hosting Management
Lighthouse Studio can upload your survey to a web server (Field | Hosting Management) to publish your questionnaire to the Web. You can use Sawtooth Software's hosting service (see http://www.sawtoothsoftware.com/services/hosting), or do it yourself using your company's server or a rented third party server. The server must have access to a database (MySQL or Microsoft SQL Server are supported databases) and support Perl.
(Use Field | Prepare for Manual Upload if you want to manually upload the project using your own FTP software.)
Using Sawtooth Software Hosting Service
Sawtooth Software provides a convenient service for hosting your surveys, which for most users' licenses is free.
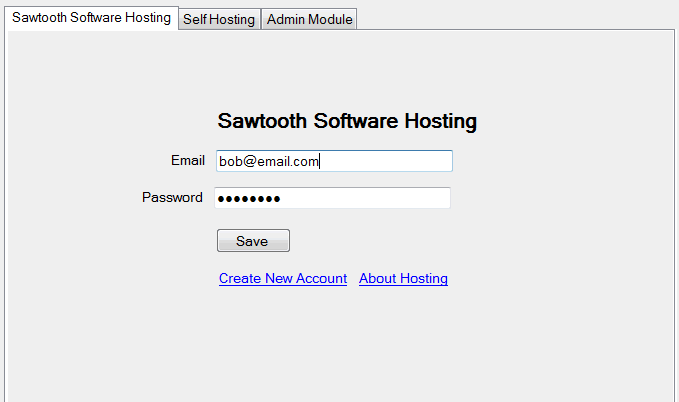
When you click Field | Hosting Management, a dialog appears prompting you for your hosting account information. Click "Create New Account" to create a new hosting account. Once you are approved and have an account, enter your email and password to link Lighthouse Studio with your hosting account.
Once you click Save, the dialog changes:
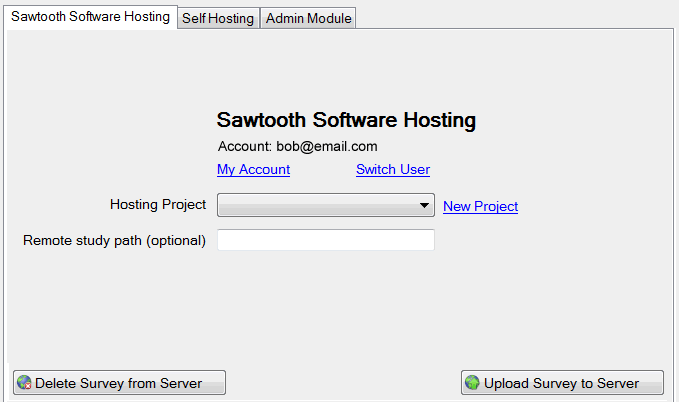
To create a new hosting project click New Project. This will take you to the online hosting service where you specify the details of your project, including a project name, and set up a new server. Once the server is ready (often takes a minute or two and you are notified via email when your project is ready) you will see the project name in the Hosting Project drop down list. Select your project and then click Upload Survey to Server to upload the survey. To delete the survey from the server click "Delete Survey from Server." (This step will delete all your data for the selected hosting project! A warning message is displayed before data are deleted so you can confirm your intentions).
Optional: You may upload multiple surveys to the same project, as long as they reside in separate folders on the server (e.g. English and German versions of the same survey). The Remote study path allows you to specify the path on your server where this study will be uploaded. If the path does not exist Lighthouse Studio creates it. Let's say for example that your server root URL is: http://mystudy.cloudssi.com. By default the study is uploaded to the root of the web server and the respondent login link is: http://mystudy.cloudssi.com/login.html. If you'd like to upload multiple studies to the server and you'd like to put them in separate folders, then you would enter the folder name into the Remote study path setting. For example if you entered study1 as the remote path then your final link would be: http://mystudy.cloudssi.com/study1/login.html.
Self Hosting
When you click Field | Hosting Management, you are shown the Hosting Management dialog. Click the Self Hosting tab if you plan to host the survey on your own web server.
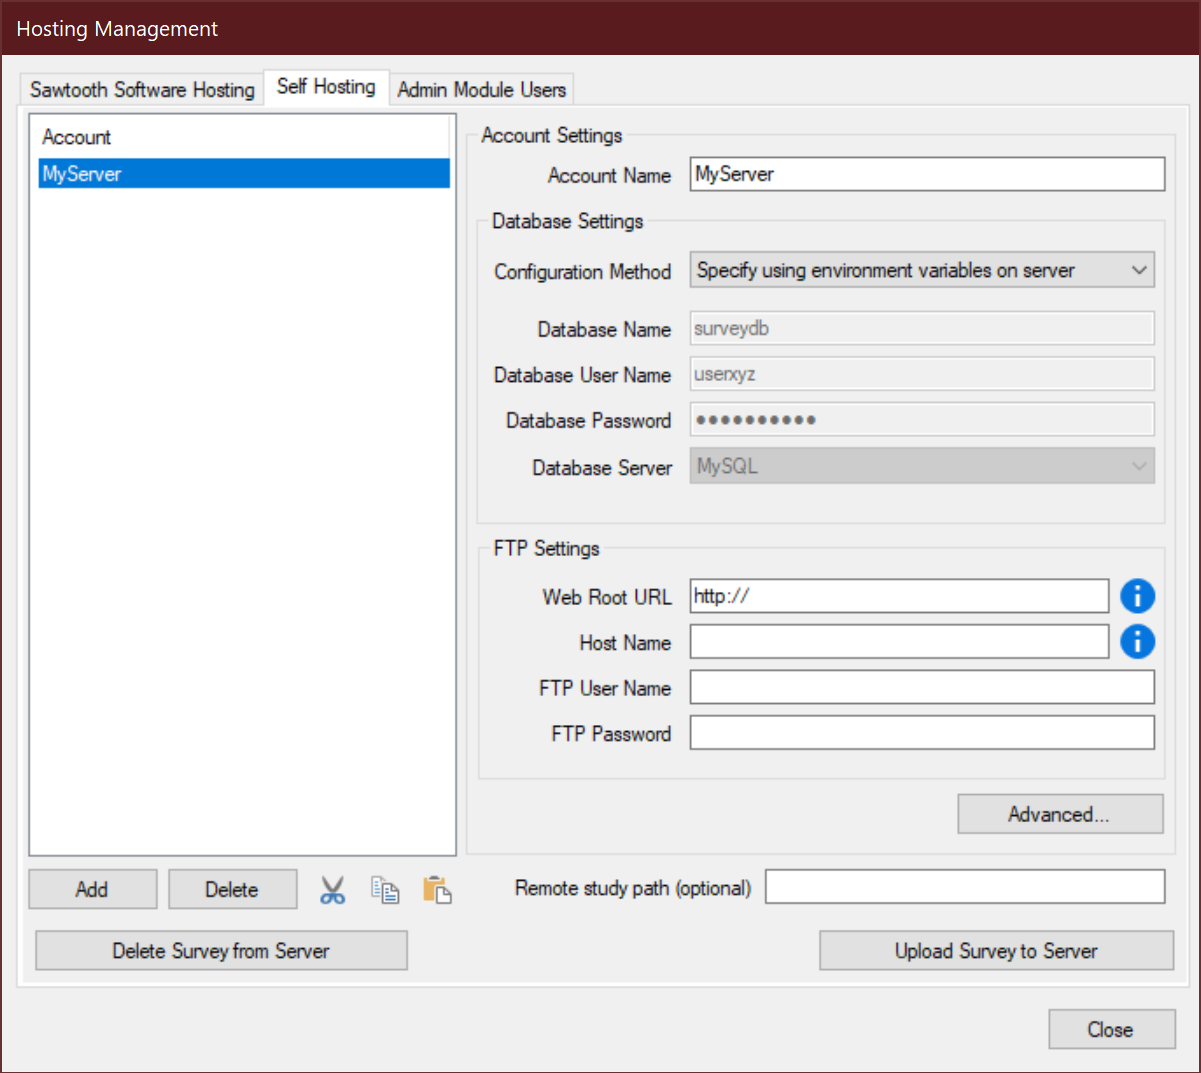
By default, you specify the database settings within Lighthouse Studio and these settings are uploaded to the server with your survey. With this option, you must specify the Database Name, Database User Name, Database Password, and Database Server, Database Name. Your ISP or your IT department will provide you that information. Alternatively, you can change the configuration method to 'Specify using environment variables on server'. In this case, your ISP or IT department will configure the server with the appropriate information, and the survey will use that. In that case, you do not need to include the information in the interface here. For more information about configuring environment variables, see Appendix F.
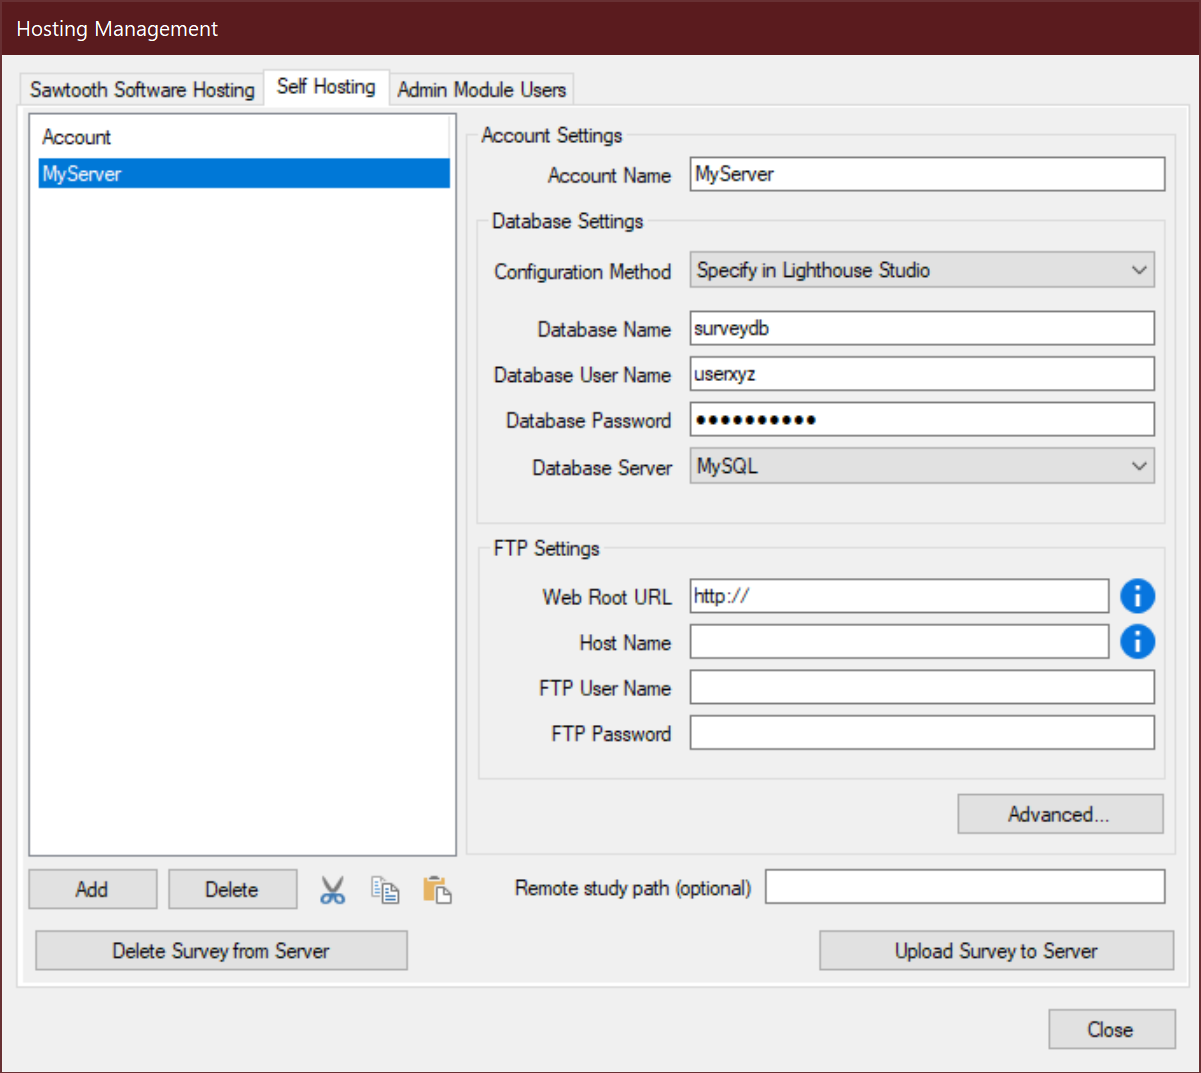
You may have multiple servers that you use and each server's FTP (File Transfer Protocol) configuration can be stored within this dialog. When you open a different project in Lighthouse Studio, any server configuration information you have entered for other projects (on your same computer) is shared and made available.
Click Add or Delete buttons to add/delete an existing configuration.
Each project must be uploaded to its own folder on the server. If you try to upload a project to a folder already containing a Lighthouse project (at the root level), Lighthouse Studio will warn you of this and not proceed.
Your ISP or your IT department will provide you with the Web Root URL, Host Name, User Name, and Password needed to connect with and save files to your server. The Web Root URL is the URL of your server with no project specific info such as http://www.sawtoothsoftware.com. The Host Name provides the ftp location of your server; the User Name and Password log you into that server. We encourage you to use strong passwords that include a combination of alphabetic and numeric characters and are at least eight characters long.
Advanced Settings:
From the Hosting Management dialog, when you click Advanced, the Advanced Server Configuration dialog is displayed:
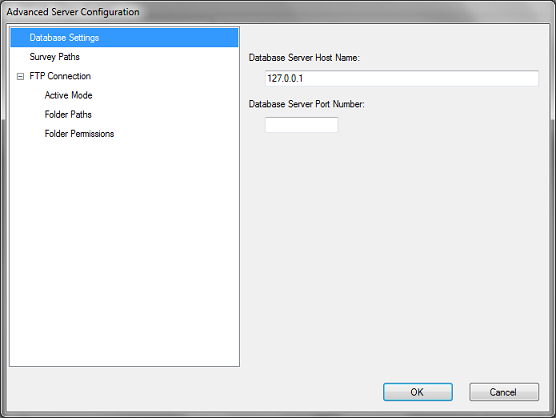
Database Settings: If you must specify the Database Server Host Name and the Database Server Port Number (if the server manager specifies that you need to do so), you can do so here.
Survey Paths
Sometimes you may find that your ISP doesn't let you set up directories the way we've outlined. Or, you may simply have other preferences regarding your study's architecture on your server. You can change the names and locations of the directories on this dialog.
This dialog lets you specify relative paths for the Administrative, CGI Scripts and Data directories.
The three paths are as follows:
Relative Path from
| Study to CGI Scripts: | Path from login.html and admin.html to the directory that contains ciwweb.pl and admin.pl |
Relative Path from
| CGI Scripts to Admin: | Path from Perl scripts to the /admin directory (may contain Sawtooth Script) |
Relative Path from
| CGI Scripts to Graphics: | Path from Perl scripts to the /graphics directory (may contain Sawtooth Script) |
(The ability to specify Sawtooth Script in the relative paths provides more flexibility, for example with common cgi-bin folders, so that a generic path statement can apply to multiple studies.)
When you use the Add Image icon to add graphics to your study, your <img> tags then contain the function [%GraphicsPath( )%] in their paths. [%GraphicsPath( )%] will be replaced on the web server with the path that you provided here in the Server Directory Paths dialog. For example if you set your graphics path to "../My Graphics/" and you included <img src="[%GraphicsPath( )%]picture.jpg" BORDER="0"> in your questionnaire, then on the web server that path would dynamically change to <img src="../MyGraphics/picture.jpg" BORDER="0">.
If you rename the directories that the files are stored in on your server or use absolute file references, put the new MyGraphics file in your CGI Scripts directory so that the Perl scripts can find your study.
If you can only run Perl scripts from one directory and you want to have multiple studies running at the same time. The paths in the Survey Paths dialog must be set correctly for each study and then each study's STUDYNAME_path.cgi file must be placed in the cgi-bin directory. For example, if two studies "T1" and "T2" share the same Perl files, then the cgi-bin directory would need to contain the T1_path.cgi and T2_path.cgi files.
(Auto upload will detect if you are using the common cgi-bin setup and put the STUDYNAME_path.cgi into the cgi-bin folder. If the cgi-bin folder does not already exist, auto upload will create it and upload the perl files there as well.)
FTP
FTP Connection determines how auto upload will copy your files to the server. By default, Lighthouse Studio attempts to detect the connection type with (Autodetect). If you already know the connection, you may change it here.
Normal is the standard FTP network protocol for uploading files with no security. Over SSL is an extension to FTP that will securely upload your files using Transport Layer Security (TLS) or Secure Sockets Layer (SSL) if your server supports FTPS or FTP-SSL or FTP-Secure. Over SSH uses the Secure Shell protocol 2.0 (SSH-2) to securely upload your files if your server supports SFTP or Secure FTP or tunneling FTP through an SSH Connection. We encourage you to use SSL or SSH which encrypt all data traffic.
Transfer Mode determines how the connection is established. Passive Mode is the default settings on most servers, and should also be used if your computer is behind a firewall. Sometimes, you will be asked to use a different Port number from the default. If you have been given a Port number, specify that here. Active Mode tells the server to initiate the connection to your computer using an optionally specified range of ports.
If the default folder permissions that Lighthouse Studio uses don't work for your particular server configuration, you may change the permissions for specific folders here. You can always click Reset to Default to revert to the original settings.
Use the Remote Study Folder on the Server Directory Paths tab to create a new folder for the current Lighthouse study on your web server. For example, specify study1 to place your study within the study1 folder on your web server.
After clicking Upload Survey to Server, another dialog with the Command Status window shows you the current operation the auto upload function is performing. The Connection Status window shows the FTP commands that Lighthouse Studio has used. This window acts like a progress log.
Upload Survey to Server attempts to upload your project to the given server in the specified remote study folder. It will initially check to see if a project with the same name exists in given remote folder. If the names match, it checks the specified database to see if the same project name exists. If the database already contains the same project name in a different remote folder, the current upload is aborted. Otherwise the project is uploaded to the given folder and upon completion; the project settings are entered into the database.
After a project is completed, you may wish to have the project files removed from the remote server by running Delete Survey from Server. This removes all project related information from the remote server like database tables and files. If you attempt to remove a project with a different name or the files have already been removed, Lighthouse Studio will warn you of this and not proceed.
Admin Module Users
Survey administrators log into the Online Administrative Module using a browser (the login page is admin.html on the web server) to manage studies in the field and download data. A user name and password are required to access the Administrative Module.
This area is used to specify the users with access to the Admin Module. There is a required default user 'admin' with a randomly generated password (which you can change) and full access permissions. You may also create additional users with their own passwords and access permissions.
Users with read only access have limited abilities in the Admin Module (e.g., cannot download the data, delete or accumulate disqualified/incomplete data, edit the passwords file, or reset the survey).
We encourage you to use strong passwords that include a combination of alphabetic and numeric characters and are at least 12-15 characters long.
Customizing the Admin Module
You may customize the look of the Admin Module by creating your own CSS file. In the Admin Module CSS File field on the Admin Module tab, enter the name of your custom CSS file. You can place this CSS file in the graphics folder or you can refer to a remote file by listing the full URL (i.e. http:// …). If the CSS file is placed in the graphics folder, you will need to include the graphics path. For example:
[%GraphicsPath()%]your_style.css
By including a custom CSS file we will remove all "Sawtooth Software" branding from the Admin Module.
To remove our title and include your company's logo include the following CSS:
#title_text
{
display: none;
}
#title
{
background:url('your_logo.gif') no-repeat center center;
height: 50px;
}